How to set up Airflow 2.0 with PostgreSQL
Setting up airflow + postgres, was surprisingly more difficult (and undocumented) than I imagined. In this post, I document all steps taken to docker-build and connect airflow and postgres containers, intialize the services, and start the airflow web user interface.
Goal
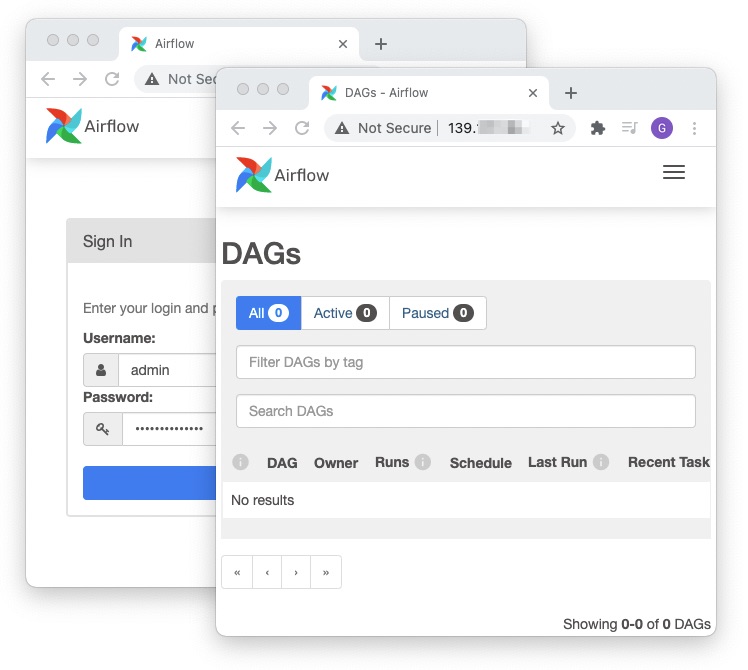
In this guide, we will run Airflow and Postgres in Docker containers, connect the two, and get to the log in page:
We will use the latest versions as of April 2021:
- Airflow 2.0.1
- PostgreSQL 13.2
Prerequisites
- An Ubuntu VM with Docker installed (you can follow this guide)
- Working knowledge of Docker
- A DockerHub account
Step 1. Get docker images
Unless otherwise noted, all commands in this post are run on the VM.
For PostgreSQL, we will use the official docker image:
docker pull postgres:13.2
For Airflow, we will use this Dockerfile:
FROM python:3.8-slim-buster
RUN apt-get update && apt-get install -y vim
RUN \
    pip install apache-airflow[docker,amazon]==2.0.1 --constraint https://raw.githubusercontent.com/apache/airflow/constraints-2.0.1/constraints-3.8.txt \
    && pip install psycopg2-binary
ENV AIRFLOW_HOME=/airflow
CMD ["airflow"]
We're also installing:
The psycopg2-binary package is required for airflow to be able to speak
postgres. The two provider packages docker and amazon are optional, but
are needed for my particular project.
Build it like this:
docker build --tag airflow .
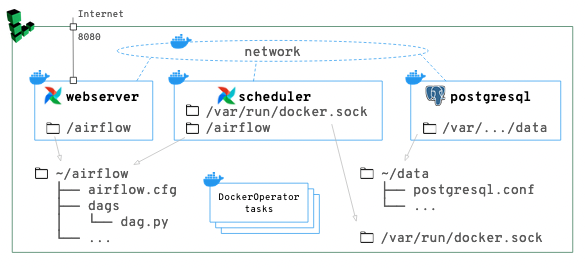
Step 2. Create a docker network
We will have 2 airflow containers that need to connect to a postgres container. How do the airflow containers find the postgres container? By creating a network and connecting the containers to the network. With this setup, the containers can discover each other by name.
Create a network:
docker network create af-pg-net
We can now connect containers to this af-pg-net when starting them:
docker run --network=af-pg-net [...] IMAGE
or, to connect a running container to a network:
docker network connect af-pg-net CONTAINER
To view existing networks:
$ docker network ls
NETWORK ID     NAME        DRIVER    SCOPE
eff5ba9e7c9e   af-pg-net   bridge    local
...
Resources:
- How to ping from one container to another
- Offical docs on
network create
Step 3. Start postgres and create a database for airflow
In this step, we will start the postgres container, and configure it so that:
- airflow can access postgres (user name and password)
- airflow has a database where it can create/maintain tables it needs
Step 3a. Start postgres
First, we start the postgres container. Here's the full command.
docker run --rm -d --name postgres -e POSTGRES_PASSWORD=airflow2104 --network af-pg-net -p 5432:5432 -v ~/data:/var/lib/postgresql/data postgres:13.2
Details:
--network af-pg-netConnect this container to theaf-pg-netnetwork. The airflow container will also be conneted to this same network, so that it can find postgres by host name (name of container).--name postgresName of the container. Other containers (on the same network) can find this container by its namepostgres.-p 5432:5432We expose the port which postgres listens on (the RHS) to the same port number on host (the LHS).
With the 3 options above, other containers can now find this container at postres:5432 on the af-pg-net network.
We also specify these options:
-
-v ~/data:/var/lib/postgresql/dataThe RHS (/var/lib/postgresql/datainside the container) is where postgres stores everything -- tables, settings, etc. We can delete/lose the container (which is the point of using Docker!) but we must not lose this folder. We will map it to~/dataon the host, which we can choose to back up by, for example, taking snapshots (not covered in this post). -
-e POSTGRES_PASSWORD=airflow2104This is a required environment variable for thepostgresimage.- One way to not type it into the command line, is to keep it in a file like
~/.pgpassand read it:docker run -e POSTGRES_PASSWORD=$(cat ~/.pgpass) .... - If we don't specify it, we get an error message:
$ docker run --rm -it postgres:13.2
Error: Database is uninitialized and superuser password is not specified.
       You must specify POSTGRES_PASSWORD to a non-empty value for the
       superuser. For example, "-e POSTGRES_PASSWORD=password" on "docker run".
       You may also use "POSTGRES_HOST_AUTH_METHOD=trust" to allow all
       connections without a password. This is *not* recommended.
       ...
- One way to not type it into the command line, is to keep it in a file like
-
--rmAutomatically remove container when it exist. The important stuff (the databse data) will be persisted on the host with the-vflag. -dDetach immediately and run in background.postgres:13.2This is the image we are going to run.
Ok, let's actually run it:
$ docker run --rm -d --name postgres -e POSTGRES_PASSWORD=airflow2104 --network af-pg-net -p 5432:5432 -v ~/data:/var/lib/postgresql/data postgres:13.2
a658b72b44349ee3e2570dbf85e3547b1ed2589637d9e758bd00cc7518f126a0

$ docker ps
CONTAINER ID   IMAGE           COMMAND                  CREATED              STATUS              PORTS                    NAMES
a658b72b4434   postgres:13.2   "docker-entrypoint.s…"   About a minute ago   Up About a minute   0.0.0.0:5432->5432/tcp   postgres
It's running!
Let's take at look at the data folder:
$ cd ~/data
-bash: cd: data: Permission denied

$ ls -la ~
...
drwx------ 19 systemd-coredump root   4096 Apr 13 07:48 data
...
As you can see, the owner/group of this folder looks odd. This is because of how postgres' Dockefile is written. If you want to back up this folder, you'll likely need to fix the owner/permissions of this folder. This stackoverflow answer may help but I have not tried it.
Just for fun, let's peek inside with sudo:
$ sudo ls ~/data  # enter the root password for your linode VM
PG_VERSION  pg_commit_ts  pg_ident.conf  pg_notify    pg_snapshots  pg_subtrans  pg_wal                postgresql.conf
base        pg_dynshmem   pg_logical     pg_replslot  pg_stat       pg_tblspc    pg_xact               postmaster.opts
global      pg_hba.conf   pg_multixact   pg_serial    pg_stat_tmp   pg_twophase  postgresql.auto.conf  postmaster.pid
Ok, let's try connecting to postgres using the psql client:
$ psql -h localhost -p 5432 -U postgres
Password for user postgres:
psql (12.6 (Ubuntu 12.6-0ubuntu0.20.04.1), server 13.2 (Debian 13.2-1.pgdg100+1))
WARNING: psql major version 12, server major version 13.
         Some psql features might not work.
Type "help" for help.

postgres=#
Now we're in the psql repl:
postgres=# \du
                                   List of roles
 Role name |                         Attributes                         | Member of
-----------+------------------------------------------------------------+-----------
 postgres  | Superuser, Create role, Create DB, Replication, Bypass RLS | {}

postgres=# \dt
Did not find any relations.
postgres=# \l
                                 List of databases
   Name    |  Owner   | Encoding |  Collate   |   Ctype    |   Access privileges
-----------+----------+----------+------------+------------+-----------------------
 postgres  | postgres | UTF8     | en_US.utf8 | en_US.utf8 |
 template0 | postgres | UTF8     | en_US.utf8 | en_US.utf8 | =c/postgres          +
           |          |          |            |            | postgres=CTc/postgres
 template1 | postgres | UTF8     | en_US.utf8 | en_US.utf8 | =c/postgres          +
           |          |          |            |            | postgres=CTc/postgres
(3 rows)

postgres=# \q
$
Fun (and potentially scary) fact: you can access this postgres from your laptop
by replacing -h localhost with your Linode's IP address, like: -h
123.123.123.123. Make sure to use a strong password!
A quick review of postgres commands:
| command | what it does |
|---|---|
\l |
list databases |
\c DBNAME |
connect to database |
\c DBNAME USER |
connect to database as user |
\c postgres postgres |
back to default user (postgres) |
\dt |
list tables and relations in current database |
\du |
list users |
\d+ TABLE |
show table schema |
\q |
quit psql REPL |
To reset a user's password, log in as admin user, then issue \password
$ psql -h localhost -p 5432 -U postgres

postgres=# \password USER
Enter new password:
Enter it again:

postgres=# \q
Step 3b. Create a database for airflow
Start the psql client:
$ psql -h localhost -p 5432 -U postgres
Password for user postgres:
...
Once connected, create an user and a database for airflow.
postgres=# CREATE USER airflow PASSWORD 'airflow';
CREATE ROLE

postgres=# CREATE DATABASE airflow;
CREATE DATABASE

postgres=# GRANT ALL PRIVILEGES ON DATABASE airflow TO airflow;
GRANT

postgres=# \l
                                 List of databases
   Name    |  Owner   | Encoding |  Collate   |   Ctype    |   Access privileges
-----------+----------+----------+------------+------------+-----------------------
 airflow   | postgres | UTF8     | en_US.utf8 | en_US.utf8 | =Tc/postgres         +
           |          |          |            |            | postgres=CTc/postgres+
           |          |          |            |            | airflow=CTc/postgres
 postgres  | postgres | UTF8     | en_US.utf8 | en_US.utf8 |
 template0 | postgres | UTF8     | en_US.utf8 | en_US.utf8 | =c/postgres          +
           |          |          |            |            | postgres=CTc/postgres
 template1 | postgres | UTF8     | en_US.utf8 | en_US.utf8 | =c/postgres          +
           |          |          |            |            | postgres=CTc/postgres
(4 rows)

postgres=# \q
Step 4. Start Airflow
Step 4a. Initialize $AIRFLOW_HOME
Create an empty folder at ~/ariflow. We will mount this into the airflow
container at /airflow which is the default $AIRFLOW_HOME directory.
$ mkdir ~/airflow
$ ls ~/airflow  # empty
Run the airflow container without any commands. It will complain, but populate
the /airflow directory with a few files.
$ docker run --rm -it  -v ~/airflow:/airflow airflow db init
usage: airflow [-h] GROUP_OR_COMMAND ...
...
airflow command error: the following arguments are required: GROUP_OR_COMMAND, see help above.

$ ls ~/airflow  # we now have config files!
airflow.cfg  airflow.db  logs  unittests.cfg  webserver_config.py
Step 4b. Modify airflow.cfg
Open ~/airflow/airflow.cfg in an editor (with sudo) and edit it as follows:
$ cat ~/airflow/airflow.cfg
...
executor = LocalExecutor
...
sql_alchemy_conn = postgresql+psycopg2://airflow:airflow@postgres:5432/airflow
...
load_examples = False
...
Notes:
-
We switch to
LocalExecutorso DAG runs can be parallelized. -
About the sql connection string
sql_alchemy_conn:-
The format is:
postgresql+psycopg2://<user>:<password>@<host>/<db>. -
For
<host>we usepostgres, which is the docker image name. As long as both the postgres and airflow containers are on the same network (docker run --net dockernet [...]) they can find each other by host name (link)
-
-
Turn off the
load_examplesflag now, because I didn't find them particularly useful in learning, they just clutter the web ui, and most importantly, you need to stop/start theairflow schedulerfor changes toairflow.cfgto take effect -- something you don't want to do when DAGs are running.
Now we can initialize the airflow db with airflow db init (docs):
$ docker run --rm -it -v ~/airflow:/airflow airflow --net af-pg-net db init
DB: postgresql+psycopg2://airflow:***@postgres:5432/airflow
[2021-04-15 06:33:57,328] {db.py:674} INFO - Creating tables
INFO  [alembic.runtime.migration] Context impl PostgresqlImpl.
...
...
Initialization done
Let's take a look in postgres to see what airflow created:
$ psql -h localhost -p 5432 -U postgres
Password for user postgres:
...

airflow=> \dt
                    List of relations
 Schema |             Name              | Type  |  Owner
--------+-------------------------------+-------+---------
 public | ab_permission                 | table | airflow
 public | ab_permission_view            | table | airflow
 public | ab_permission_view_role       | table | airflow
 public | ab_register_user              | table | airflow
 public | ab_role                       | table | airflow
 public | ab_user                       | table | airflow
 public | ab_user_role                  | table | airflow
 public | ab_view_menu                  | table | airflow
 public | alembic_version               | table | airflow
 public | connection                    | table | airflow
 public | dag                           | table | airflow
 public | dag_code                      | table | airflow
 public | dag_pickle                    | table | airflow
 public | dag_run                       | table | airflow
 public | dag_tag                       | table | airflow
 public | import_error                  | table | airflow
 public | job                           | table | airflow
 public | log                           | table | airflow
 public | rendered_task_instance_fields | table | airflow
 public | sensor_instance               | table | airflow
 public | serialized_dag                | table | airflow
 public | sla_miss                      | table | airflow
 public | slot_pool                     | table | airflow
 public | task_fail                     | table | airflow
 public | task_instance                 | table | airflow
 public | task_reschedule               | table | airflow
 public | variable                      | table | airflow
 public | xcom                          | table | airflow
(28 rows)

airflow=> \q
We also execute the airflow users create command to create the admin account.
$ docker run --rm -it -v ~/airflow:/airflow --net af-pg-net airflow users create -u admin -e your@email.com -f First -l Last -r Admin -p $(cat ~/.afpass)
...
Admin user admin created
Step 4c. Start airflow
Finally, we can start the webserver:
$ docker run -d --rm -it -p 8080:8080 -v ~/airflow:/airflow --name airflow_webserver --net af-pg-net airflow webserver
... and the scheduler:
$ docker run -d --rm -it -v ~/airflow:/airflow -v /var/run/docker.sock:/var/run/docker.sock --name airflow_scheduler --net af-pg-net airflow scheduler
In the command above, we mount /var/run/docker.sock so that ...
Running containers are:
$ docker ps -a
CONTAINER ID   IMAGE           COMMAND                  CREATED          STATUS          PORTS                    NAMES
bf8aebfbd654   airflow         "airflow scheduler"      3 seconds ago    Up 2 seconds                             airflow_scheduler
39fb37e82b89   airflow         "airflow webserver"      11 seconds ago   Up 10 seconds   0.0.0.0:8080->8080/tcp   airflow_webserver
06d6ad7fd1e0   postgres:13.2   "docker-entrypoint.s…"   24 hours ago     Up 24 hours     0.0.0.0:5432->5432/tcp   postgres
🎉 And finally, access the web interface at <IP>:8080: